Smart Leggings for Online Jean Shopping

Like-A-Glove-LikeAGlove-Leggings-Gift-Guide-2015-Best-Fashion-Tech

I love shopping online – the convenience, the wider range of sizes available, no lines to wait in, and the ability to do so at 10pm in my pajamas while watching The Bachelor. However, the one item I’m always most hesitant to buy online is jeans. Unless I’m reordering the same size, style, brand as something I already own (and even then it’s still iffy), chances are about 90% that I won’t like them and will end up returning them. Sizing is horribly inconsistent in women’s clothing, changing drastically from brand to brand, and making online shopping for something as fitted as jeans almost impossible.

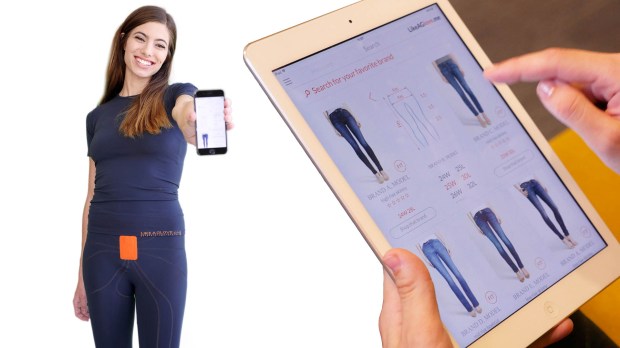
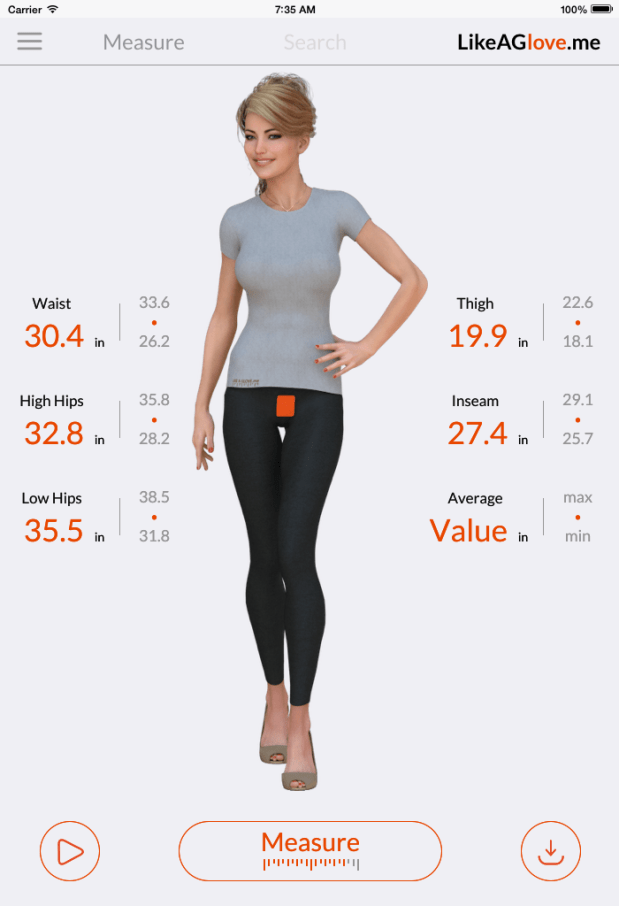
So when I first saw an ad for these “smart leggings” I was immediately curious and hopeful. Could this actually be the solution to online jean/pant shopping for women? The company is called LikeAGlove, and the leggings use embedded stretch sensors to take measurements all up and down your legs (waist, upper and lower thigh, upper and higher hips, and inseam). After getting the measurements, the leggings send the data over Bluetooth to a free app, which then searches through thousands of jeans to recommend pairs that will fit. It sounds so simple!

measure

The Info: The leggings are one-size-fits-all. Fit hips/waist of up to 60″ (150cm) and inseam of up to 55″ (140cm). You can pre-order them now for $79 here, to be shipped this Spring (their website says Q1 2016).

I also think they’d be a great way to track weight loss! It’s hard to always measure yourself in the exact same places to track inches lost, and these would make it super easy to get accurate measurements.

What do you think about these? Would you buy them?

xoxo,
Veronica


Rainy Day Activity: Watch Harry Potter

8178443672_87d458b231_o.png

El niño is here. It is pouring in Marin County today and instead of staying at home on the couch cuddling with my cats, I am at work. But if you’re lucky enough to be at home today because your office decided to close due to weather or you just have the day off, it’s time to catch up on Harry Potter.

Yes, you can easily say that I am a Hogwarts fanatic and love Harry Potter. It’s true, all of it. But one of the main reasons I am writing this post today is because last week we lost Alan Rickman who played Professor Snape in all the Harry Potter films (you might also remember him from Galaxy Quest or Dogma). He was definitely a talented actor and will be missed.

giphy.gif

LETTHEMEATCAKE-FOREVER.TUMBLR.COM

So as an homage to Mr. Rickman, and to get through the cold, gloomy day, I challenge you: get through as many Harry Potter movies as you can today. My husband surprised me last weekend with the blu ray box set of all the movies, purchased for only $80 at Best Buy (great deal, right??). We ended up getting through Harry Potter and the Sorcerer’s Stone and Harry Potter and the Chamber of Secrets. 

We will for sure be watching more this weekend if the weather is still like this. Stay dry out there!

Do you have a favorite Harry Potter movie?

xoxo,

Leigh

Recipe: Slow Cooker Balsamic Chicken

Anyone who knows me (and I think you all do by now) knows that I swear and live by my crockpot (see my hot cider recipe here). It’s super convenient – prep something the night before, throw it into the crockpot in the morning and 12 hours later you have a delicious meal waiting for you. Bonus: your home smells delicious all day.

One of my go-to signature crockpot meals is balsamic chicken. I first discovered this recipe on Skinny Ms while I was doing a low-carb diet and it turns out that this recipe is low-carb and low-fat, so double win for me. This chicken dish is good over pasta, rice or my personal favorite – Israeli couscous. This dish also pairs well with a side salad. I hope you try it out! Crockpot balsamic chicken has become a staple in my household, that’s for sure.

balsamic-chicken.jpg

Ingredients:

  • 4-6 boneless skinless chicken breast. I recommend the Eat Right chicken breast from Safeway. It doesn’t have as much fat on it.
  • 2 cans diced tomatoes (14.5 oz) or you can use the 28 oz can
  • 1 small onion, sliced
  • 4 garlic cloves
  • 1 tablespoon olive oil. I use extra virgin.
  • 1 teaspoon dried basil, oregano, rosemary; 1/2 teaspoon thyme
  • 1/2 cup Balsamic Vinegar. I add a little more than a 1/2 cup because I’m obsessed with balsamic vinegar.
  • Black pepper and salt to taste
  • Cook time: 4 hrs (or longer)

To prepare:

1. Pour the 1 tablespoon of olive oil on the bottom of your crock pot.

2. Salt and pepper each chicken breast and then place into the crock pot. I tend to put salt and pepper on the bottom of the crock pot and flip the chicken breasts over after one side is salt and peppered.

3. Place the sliced onion on top of the chicken breast. Make sure the onion slices are spread across every piece of chicken breast.

4. Put in the 1 teaspoon of dried basil, oregano, rosemary, and the 1/2 teaspoon of thyme on top of the onions.

5. Place the 4 cloves of garlic on top of the dried herbs.

6. Pour the 1/2 cup balsamic vinegar over the chicken, herbs, onions, and garlic. Add some extra balsamic vinegar if you like the taste. (I tend to.)

7. Top with the 2 cans diced tomatoes.

8. Cook on high for 4 hours. The longer you cook the dish, the more tender the chicken will be.

The nice thing about this particular crock pot dish, is that it will last you two nights (if you’re just two people) and it even tastes better the next day, in my opinion.

Give this recipe a shot and let me know what you think in the comments!

xoxo,

Leigh

Styling Kit Essentials

Today I’ll be spending the whole day running from appointment to appointment pulling fabulous clothes and accessories, prepping for a big fashion shoot I’ll be styling tomorrow. Last night I spent some time looking over my styling kit to make sure I’d have everything I could possibly need, which made me think it would make a great post for aspiring stylists or for those that just like to be prepared (I use many of the things myself on a regular basis).

styling kit essentials

{Kit Essentials}

  • Double-stick tape and Hollywood Fashion Tape – Double-stick works great for lighter jobs like holding straps in place, hemming pants, and sticking a collar down. HFT is a stronger tape that can keep a low neckline in place, hold a strapless dress up, close a gap in a button-down shirt, and help keep pockets closed.
  • Binder clips (in a variety of sizes) – These will almost always be necessary to pull a loose shirt or loose pants tighter on a model.
  • Silicone CoverUps – Great for use with sheer tops and swimsuits, as well as any lightweight fabrics that you might need a little more “coverage” under.
  • Lint roller – Pick up stray lint right before the shot.
  • Shout wipes – You never know when an emergency will call for getting lipstick or food off of clothes (but hopefully it never happens!).
  • Painter’s tape – The norm for taping the bottom of shoes so they don’t get scuffed during shooting (this tape is easier to remove than most). I’ve actually found black painter’s tape in art supply stores that is even better if the bottom of the shoes might be visible in the shot.
  • Sewing kit with safety pins – Just in case a seam needs to be sewn last-minute, and pins can be used for jobs the binder clips are too large and bulky for.
  • Hanging jewelry roll – Easy for organizing jewelry and keeping it all in one place (also good if you need to stay on the move during the shoot).
  • Seam ripper – Can be used in a pinch to cut off tags and loose threads. And less likely, can be used to rip open seams that might have been sewn into sample garments by previous stylists.
  • Steamer – Used throughout the shoot to keep all of the garments wrinkle-free. Perfect for use on embellished fabrics that you wouldn’t want to iron.
  • Clear garment bags – Essential for moving clothes to the shoot location and keeping them all clean and organized. I like the clear bags so I can easily see what’s in each bag.
  • Tag gun – If tags need to be removed for a shot, you can easily re-attach them with a standard tag gun and clear standard fasteners.
  • Shoe horn – I have an extra long one that has come in very handy when trying to squeeze model’s feet into tall boots.
  • Hand warmers – These quick-activating packs keep models warm on a cold shoot and are good for warming up cold hands for close-up jewelry shots (no cold blue hands!).
  • Paper towels and tissue – For the obvious: cleaning up spills, dirt from shoes etc.

Stay tuned in early March when I’ll share the shots from the shoot! Did I miss any of your favorite styling essentials?

xoxo,
Veronica

Music: David Bowie

In Memoriam.png

While everyone was enjoying the red carpet glam and Golden Globes on Sunday night (see Veronica’s picks for worst and best dressed), the world lost a great musician.

David Bowie passed away at the age of 69 after an 18-month battle with cancer. His music influenced generations and hopefully will continue to do so. His latest album “Blackstar” was released just days ago and the music video for “Lazarus” is incredibly powerful (see below).

For me, music has always been important in my life. My dad, who introduced many different genres of music to me at a young age, played an integral part in my love for music. He introduced me to Queen and David Bowie at the same time, hence “Under Pressure” being one of my favorite songs to this day. Can’t forget about the crazy cool lyrics of “Moonage Daydream” either (you might recognize it if you saw Guardians of the Galaxy in 2014).

David Bowie was the kind of musician that pushed boundaries – a true master of music – all while keeping his private life private. From reading about his relationship with model Iman, he was a kind and gentle soul. I can’t forget to mention his costumes during concerts. He made quite the fashion statement.

Carnegie Hall will be holding a memorial concert for him on March 31 with well-known musicians paying tribute to the late singer.

How has David Bowie’s music influenced your life and what are some of your favorite songs? Check out this Spotify playlist of some of his best.

xoxo,

Leigh

Golden Globes Best and Worst Dressed

Let’s be honest – most of us fashionistas watch the awards shows just for the fashion. In fact, I rarely even watch the actual show, mostly tuning into the pre-show red carpet coverage. The Golden Globes are the official start to the awards season fashion, and I just had to name my best and worst dressed of the night.

BEST DRESSED

Best Dressed 1

It’s all about red with Jennifer Lawrence in Dior (my personal favorite of the night!), Olivia Wilde in Michael Kors Collection, and Zendaya in Marchesa.

Best Dressed 2

A perfect plunging neckline (Kirsten Dunst in Valentino Haute Couture), a vibrant caped dress (Jennifer Lopez in Giambattista Valli Haute Couture), and the best beading detail (Amy Adams in Atelier Versace).

WORST DRESSED

Worst Dressed 1

Too many ruffles (Jane Fonda in Yves Saint Laurent Couture), boring and dated (Maura Tierney in Elizabeth Kennedy), and love her but the white off-the-shoulder neckline isn’t flattering (Amy Schumer in Prabal Gurung).

Worst Dressed 2

Poofy, weird sleeves (Jennifer Jason Leigh in Roland Mouret), the color is nice but the bare midriff and matching choker aren’t working (Kate Hudson in Michael Kors), and a pancake bust with Snooki hair (Katy Perry in Prada).

Who are your picks for best and worst dressed?

xoxo,
Veronica

Documenting Monumental Moments

2016-01-06 17.52.09.png

When it comes to documenting special moments in your life you either pull out that fancy DSLR camera or bust out your smartphone to capture it. On October 11, 2015 I tied the knot! It was a magical day and we had the best photographer I’ve ever worked with (Vinh Nguyen Photography). He captured our day so beautifully (read a write-up of our wedding here) and every photo allows us to relive that special day.

But what about keeping those special moments close every day? That’s where photo albums and prints come in. After receiving all our wedding photos (there were 1300+ of them!) I downloaded the photos onto my laptop and started sifting through them. My husband and I figured out which photos we wanted to print and then I decided, why not have a photo album as a keepsake and to show those who come visit?

Let’s backtrack a little. After our engagement shoot, I was trying to figure out which website to use to order prints. Veronica had recommended I check out mpix.com because the quality of the photos were great when she received her wedding photo prints from them. So, I gave it a shot. Uploaded the photos and got the prints three days later and they turned out great.

That’s what I did. While Mpix is good for prints, it’s also great for photo albums, canvas prints, framed prints and more. They had a deal going on (you can always find a coupon for something online) and I created a great little 46 page photo album of our wedding, documenting things in order of first look/Ketubah signing, ceremony and reception. The cost of the book turned out to be only $57, which isn’t bad at all. It became pricey because we ordered about six copies of the book for family members, as well.

I am still waiting to receive my prints, but I can’t wait to find the perfect frames for our wedding photos. My husband and I are moving into a new and bigger apartment in February, so I’ll be sure to reorder a large print of this photo from Mpix again. Framed this time.

VNP05712-2_edited.jpg

Photo by Vinh Nguyen Photography

What website do you order prints from?

xoxo,

Leigh

New Year, New Lashes

New Year's eve lashes

You know those Instagram/Facebook contests you never think you’re going to win? Well I totally won one right before Christmas for a full set of eyelash extensions at Lash Lab SF!! Of course I was beyond ecstatic and made an appointment right away for December 30th so I would have a fresh set of Kardashian-esque lashes to ring in the new year (see above, my New Year’s Eve lash selfie!).

Now, I’m no newbie to lash extensions or Lash Lab – I had gotten a set of lashes right before a trip to Greece back in September. And let me tell you, that was one of the best decisions I made beauty-wise when it came to traveling in a hot and humid climate. I was immediately drenched in sweat every time I left the hotel there, so makeup wasn’t an option. Besides, who wants to spend precious vacation hours putting on makeup? But the lashes were like wearing permanent eyeliner and mascara – I always looked put-together and wasn’t afraid to take #nomakeup selfies at all of the sights. My lashes are normally super short and stick straight out, and the extensions were permanently curled and long and gorgeous!

(Left) Right after getting lashes; (Right) Two weeks later in Greece and still going strong!

(Left) Selfie after getting lashes; (Right) Two weeks later (and sweaty) in Greece and still going strong!

To those that aren’t familiar with lash extensions, the lashes are applied one at a time by a lash artist using a specially formulated, semi-permanent glue that will not irritate the eye nor damage the natural lash. The whole process takes around 1.5-2 hours for a full set. Lashes at Lash Lab are either silk, faux mink, or real mink, and length is determined by your artist after accessing your natural lashes (I usually go with a mix of 11-13mm).

Before and after lashes

Before (top row) and After (bottom row) lash extensions

They don’t come cheap – a set of natural looking lashes from a master artist at Lash Lab starts at $219. And the lashes have to be filled in every 2-3 weeks ($75 within 2 weeks, $99 within 3 weeks). I chose to fill every 3 weeks because I was being very careful with them and wasn’t losing too many lashes. Check out all of the lash options at Lash Lab and their pricelist here.

Here are some of the tips I’ve taken away from my experience with lash extensions:

  • Be prepared: you can’t get your lashes wet for at least 24 hours (I try to go 48). Plan ahead and either buy some goggles for the shower, or work the dry shampoo look for a couple of days and go shower-free to allow the glue to fully set on your lashes.
  • Same goes for eye makeup remover. If you’re planning a big night out and want to do fun eyeshadow etc, it’s best to get your lashes done a couple of days before so that you can use makeup remover without fear of removing your lashes! Though you always have to use water-based removers, no oil!!
  • Your skin also produces oil, so after those 24 hours of no water, make sure you always wash your eyelids to get rid of the excess oil which can cause the glue to break down. I suggest using baby shampoo/wash to gently wash your eyelashes. Brush them out afterwards so they dry correctly.
  • To brush your lashes, use a clean mascara wand. Most lash places will usually give you disposable spoolies to use, but if not, you can find them at most makeup stores (like these).
  • When you get lashes done, they often use gel pads placed under your eyes to make sure your bottom lashes don’t get glued to the ones being applied. These bothered my eyes and made them water, so instead they just used medical tape to tape down my bottom lashes. If you have sensitive eyes and the gel pads bother them, be sure to ask for just the tape!
  • Sleep on your back if possible and don’t rub your eyes! If you’re a side sleeper, you might find the eye of the side you sleep on loses lashes more quickly than the other eye.

Have you tried lash extensions? Do you have any additional questions? I’m happy to answer!

xoxo,
Veronica

Winter Skin and Makeup Routine

I hope you all had a fabulous New Year. It has been pretty chilly here in the North Bay the last few weeks and it just keeps getting colder. With all this cold weather and rain, I’ve noticed my skin getting dry and rough. That being said, prior to heading up to Oregon for Christmas (which is about 18-20 degrees during the day and night) I purchased some things to help keep my skin hydrated and my face looking [almost] flawless.

I mentioned this product in my holiday gift guide and I just can’t say enough good things about it. Renewed Hope in a Jar by Philosophy ($16–$47) has done wonders to my dry skin. I usually apply after washing my face or jumping out of the shower and let the cream hydrate my skin. I apply twice per day.

RenewedHope-Moisturizer-2oz-CapUnderneath-GL-60510902_S7

After applying my moisturizer (and letting it absorb into my skin and dry completely) I spray my face with Urban Decay’s B6 Complexion Prep Spray ($33). This product has worked wonders on my skin since purchase. Before applying my foundation primer, I spray this all over my face and it minimizes pores, absorbs excess oils and reduces redness. I don’t know how I ever lived without it.

604214643703_b6

Once the complexion spray dries, I follow my usual routine of applying primer (I use the Urban Decay Pore Perfecting Primer) then foundation. Prior to Oregon I switched my foundation. I was using the bareMinerals BareSkin foundation and was finding, even after my moisturizing routine, my skin would look cakey and too powdery. After watching numerous makeup videos on YouTube (my go to: NikkieTutorials), I thought I would try Too Faced Born This Way foundation in warm nude (I have a golden undertone to my skin). It has rave reviews on Ulta and Sephora (and its own website, too) and provides medium-full coverage that looks so natural.

web_bornthisway_closed_5_warmnude_2

I have to say that I am in love with this foundation and will never go back. Either apply with a beauty blender or your foundation brush.

Finishing off my makeup routine is the usual eyeliner, eyeshadow (if I feel like it) and a rose colored blush. Powder is an “if I feel like it” kind of thing, but it does set the foundation in place if you use a little bit.

Side note: If you’re looking for a hand cream that won’t leave your hands feeling oily, then check out Soap & Glory’s Hand Food (found at Ulta or online in regular or travel sizes). 

That’s my winter skin and makeup routine. What’s yours?

xoxo,

Leigh

New Year’s Eve Recap

Happy New Year

Happy New Year everyone! I hope by now you’ve recovered from the New Year’s Eve festivities and are enjoying the rest of the holiday break before work starts up again on Monday.

My husband and I hosted a small dinner party for 6 people to ring in the new year and wanted to share the menu and table setting. Even though the table is set for New Year’s Eve, you can still take ideas away for future dinner parties.

Table setting 1

For the decor, I started by laying my favorite West Elm painted metallic table runner down the center of the table. I added sequin placemats (no longer available at H&M, but similar here) and silver charger plates to each setting. I topped the chargers with silver foiled napkins (no longer available at West Elm, but similar here) and added a party popper to each. I sprinkled the runner with festive confetti, added candles of varying heights, and put some festive fringe blowouts in a glass as a centerpiece.

Table setting 2

Table setting 3

As for food, we knew we wanted to keep the main course fairly simple so we didn’t have to slave away in the kitchen the whole night rather than visiting with our guests. We decided to do a slow-cooker meal so we could prepare it early and then just set it on a timer so it was ready and waiting when it was time for dinner. The salad and the appetizers were also easy to prep ahead of time, and about 15 minutes before guests arrived I set out the apps and threw the little smokies in the oven.

NEW YEAR’S EVE MENU
Appetizers
– Bacon wrapped little smokies (recipe here)
– Shrimp cocktail
– Smoked salmon served with cream cheese and capers on crackers
– Brie and salami with crackers
Main Course
Thai-style pork over steamed white rice (recipe here) with a seasame ginger miso cucumber salad I found on Pinterest (recipe here)
Dessert
Pumpkin pie (brought by a guest). Chocolate covered strawberries are also a great option and pair well with champagne.

What did you do for New Year’s Eve? I hope everyone has had a great start to 2016!

xoxo,
Veronica